DAEMON Tools Ultra allows working not only with virtual discs but with physical ones too. Thus, you can burn data, music or images to CD/DVDs.
To burn files to disc, enter Burn a Data Disc to the field in the main window, or click the Burn tile and pick Data Disc. Here You will need to perform several easy steps:
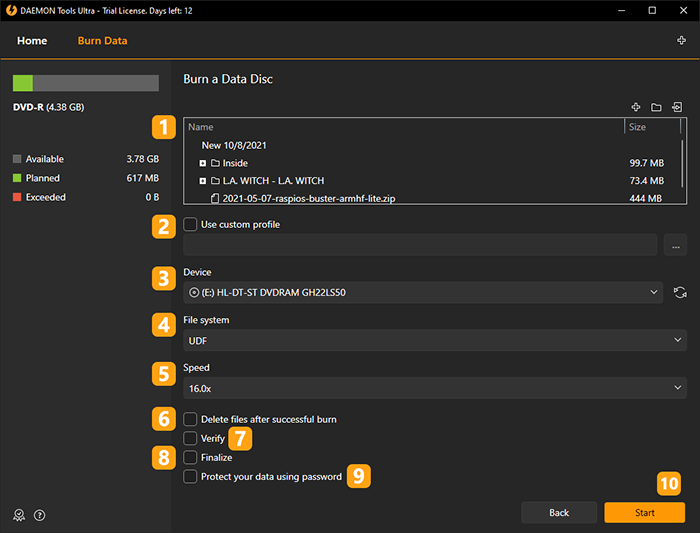
- Add files you want to burn. Using Add Files, button you can choose needed files on the hard disk. Import From Image button allows adding the files and folders from other images. With Create Folder button, it is easy to order recently added files. Also you can create a boot image, if there are one or several bootable files among those ones that you added. Bootable files are displayed in blue color. To make certain file a bootable one, go to its contextual menu and choose Boot Image option. In this case, you will be able to adjust its options on the next step.
- If you have a ready Template, you can choose and Use custom profile.
-
Insert the disc into physical device and check the available space on it.
If you have inserted a non-empty rewritable disc, you can erase it before burning having chosen the relevant option.
-
Choose File system of the future disc. Note that you can't burn files more than 2GB if you choose UDF file system.
- Choose writing Speed according to inserted disc. The duration of burning process depends on this option.
- Check Delete files after successful burn option if you don't want to store burned files on the hard drive.
- Check Verify option to test data after burning process. Note that this process will take several minutes additionally.
- Check Finalize option to forbid forthcoming burning even if the disc has some free space.
- Check Protect your data using password option to set the password for the image. You will need to enter and confirm your password on the next step then.
- Click Start button to begin the burning process or Back button to return to Images.
Here is the list of the additional settings for the bootable image:
- The type of emulation option has several alternatives. Choose No Emulation option, if you want the bootable image to be loaded into memory. If you mount an image with Floppy Emulation type, special virtual A: drive will be created for it. Note, that the size of bootable files needs to be smaller, than the size of virtual floppy. If you choose Hard Drive Emulation option, virtual C: drive will be created for your image.
- Load segment of sector option defines the initial segment. 7C0 is a traditional segment that is equal to zero.
- Number of loaded sectors is a quantity of virtual sectors that will be saved at Load Segment during the boot process.