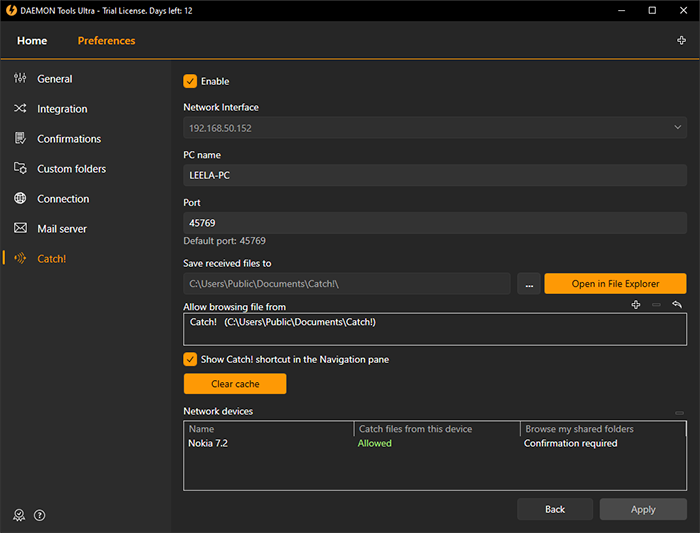
To turn on and use this feature, choose Adjust tile in the Home window, and then choose Catch! tab on a sidebar. The following window opens in the Main zone:

-
Choose Enable to turn this feature on
-
Your IP is set by default, although if you have multiple network adapters on your PC — you can choose the needed address
-
Set the PC name. That's how the other devices will see you in the network in DAEMON Tools Lite and in Explorer
-
Change the Port if needed, although we strongly recommend to leave it the way it is by default according to your local network settings
-
Pick the folder where all the received files will store, or leave the default settings. Press Open in File Explorer to open the destination folder
-
Manage the list of folders in Allow browsing file from. These are the folders that all the devices in your local network are able to browse with Catch!
-
Show Catch! shortcut in the Navigation pane option adds the shortcut for quicker access to Explorer
-
Press Clear cache button to remove all the thumbnails for images and videos. DAEMON Tools Ultra stores the previews to make browsing quicker.
-
The list of Trusted and Blocked Network devices is indicated in the window below. To add a new PC to the Network devices you need to accept the sending file request and pick any option
You can change settings for any device from the Network devices list anytime. To do that, open the contextual menu of a certain device, and pick Manage permissions. You have three variants (Allowed, Blocked and Confirmation required) for the options Catch files from this device and Browse my shared folders.
To add a Shell Extension that permits to send files directly from Explorer to any available network device, go to Integration tab and check the Share files from Explorer to network devices.
Once you’ve configured these settings press Apply and you’re ready to go!